먼저 필요한 라이브러리를 import 해줍니다.
import cv2
import numpy as np
from numpy.matrixlib import matrix

#점을 찍으면 좌표를 찾아주는 함수입니다.
from utils import get_four_points
위의 좌표찍어주는 함수입니다.
utils.py를 새로만들어 주세요
# Copyright 2017 BIG VISION LLC ALL RIGHTS RESERVED
#
# This code is made available to the students of
# the online course titled "Computer Vision for Faces"
# by Satya Mallick for personal non-commercial use.
#
# Sharing this code is strictly prohibited without written
# permission from Big Vision LLC.
#
# For licensing and other inquiries, please email
# spmallick@bigvisionllc.com
#

import cv2
import numpy as np

def mouse_handler(event, x, y, flags, data) :

    if event == cv2.EVENT_LBUTTONDOWN :
        cv2.circle(data['im'], (x,y),3, (0,0,255), 5, 16);
        cv2.imshow("Image", data['im']);
        if len(data['points']) < 4 :
            data['points'].append([x,y])

def get_four_points(im):

    # Set up data to send to mouse handler
    data = {}
    data['im'] = im.copy()
    data['points'] = []

    #Set the callback function for any mouse event
    cv2.imshow("Image",im)
    cv2.setMouseCallback("Image", mouse_handler, data)
    cv2.waitKey(0)

    # Convert array to np.array
    points = np.vstack(data['points']).astype(float)

    return points
4점을 찍는데 시계방향으로 찍어야합니다.
image = cv2.imread('data/images/first-image.jpg')
#cv2.imshow('original',image) #여자사진 원본
# 1. 이 이미지를 변환하기 위한 점 4개 구하기
print(image.shape)
point_src = np.array([0,0,
image.shape[1],0,
image.shape[1],image.shape[0],
0,image.shape[0]])
point_src = point_src.reshape(4,2)
image_dst = cv2.imread('data/images/times-square.jpg')
#cv2.imshow('dst',image_dst)#타임스퀘어 원본 불러오기
# 2. 타임스퀘어의 이미지에 매칭할 점의 좌표를 구합니다.
point_dst = get_four_points(image_dst)
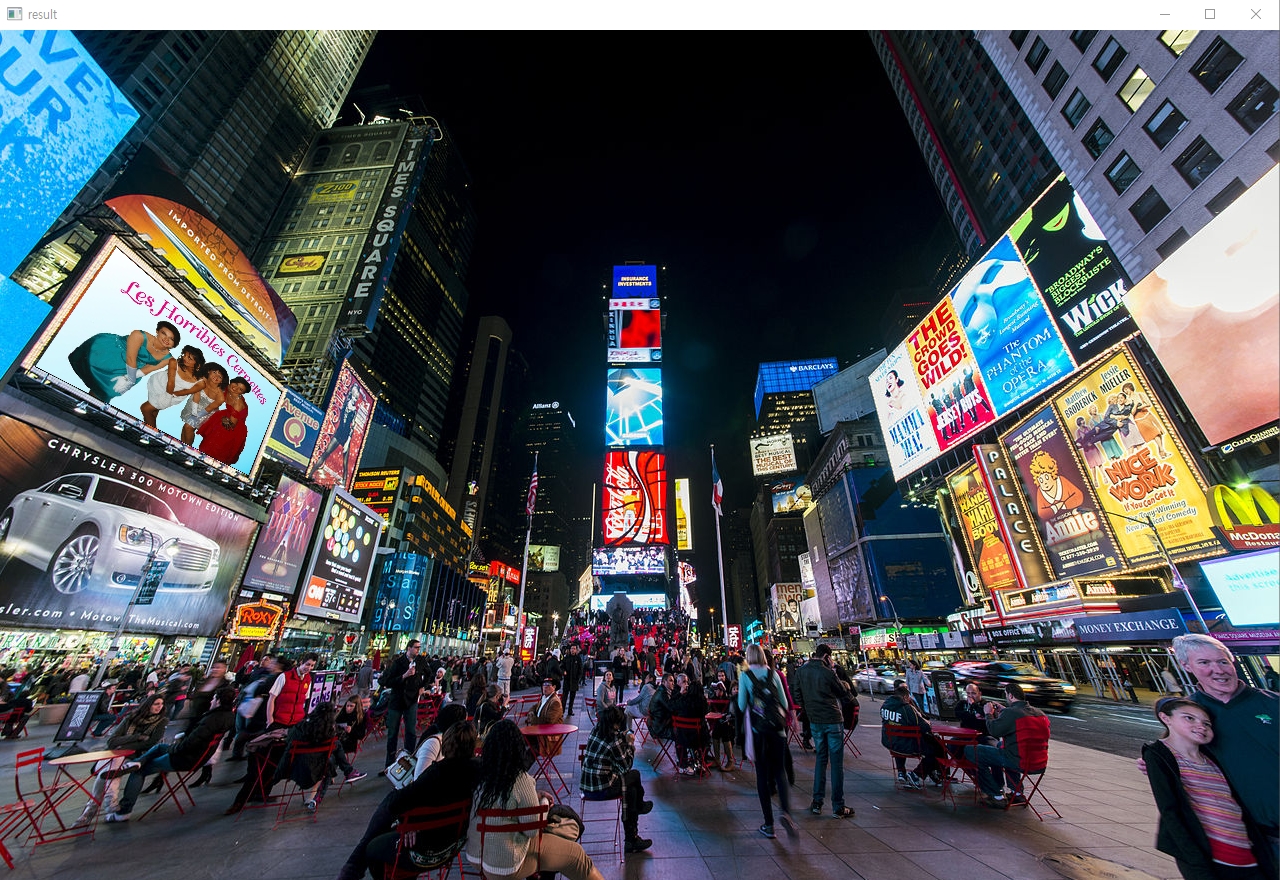
# 3. 위의 두개 이미지간의 매칭할 두 점들을 모두 찾았으니 변환 행렬을 얻어옵니다.
matrix,status = cv2.findHomography(point_src,point_dst)
# 4. image를 변환시킵니다.
image_temp = cv2.warpPerspective(image,matrix,(image_dst.shape[1],image_dst.shape[0]))
# 5. 변환된 이미지를 불러옵니다.
cv2.imshow('temp',image_temp) #여자사진 꾸긴 이미지 불러오기
# 6. 타임스퀘어 이미지에 변환된 이미지 합성
# 6-1. 타임스퀘어 이미지의 바꿀부분을, 0으로 세팅한다.
# 바꿀 영역은 이미 마우스로 클릭해서 point_dst에 들어있다
cv2.fillConvexPoly(image_dst,point_dst.astype(int),0)
#cv2.imshow('Image to 0',image_dst) #타임스퀘어 구멍낸거 출력
# 6-2. 2개의 이미지를 더하면 합성이 된다.
result = image_temp + image_dst
cv2.imshow('result',result)
cv2.waitKey(0)
cv2.destroyAllWindows()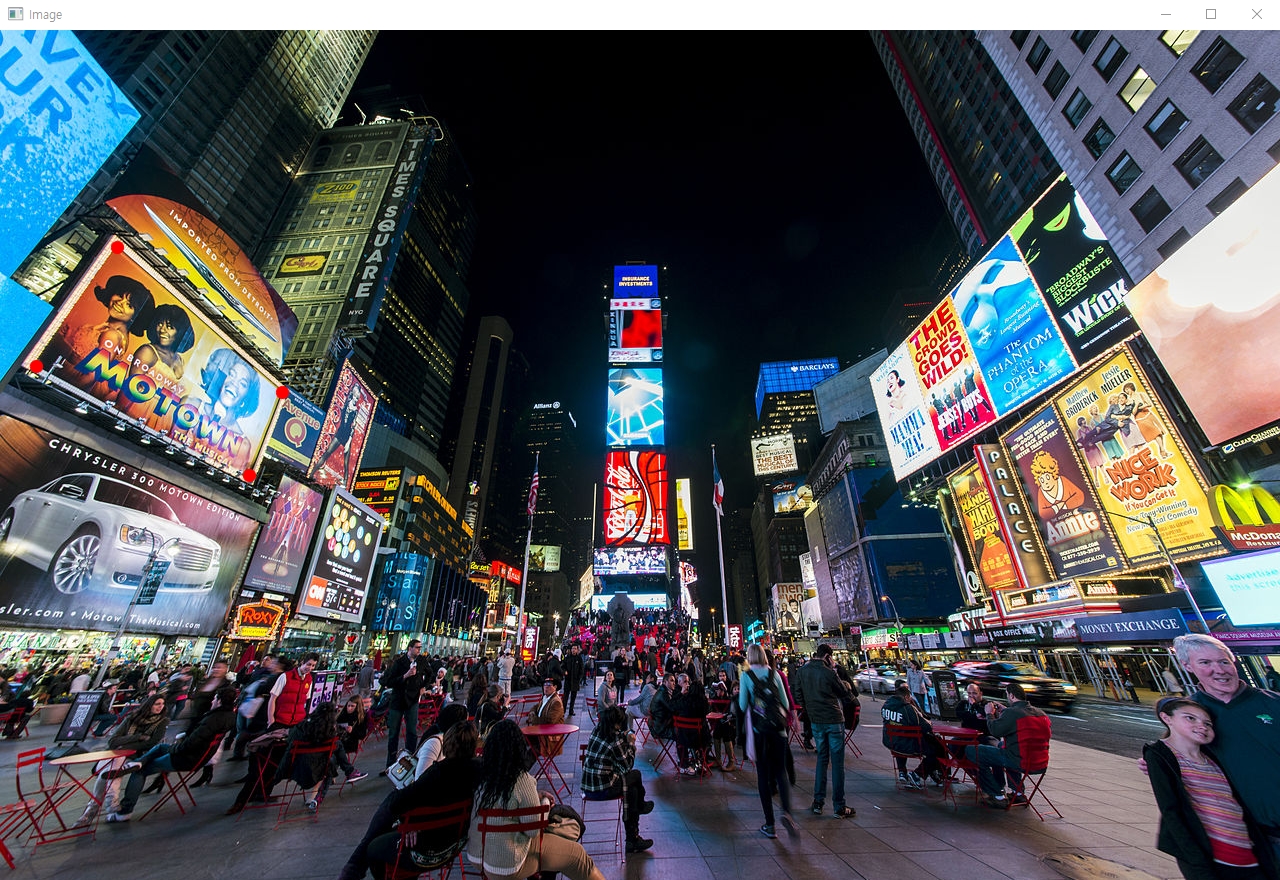
'언어 > python' 카테고리의 다른 글
| 파이썬 / 데이터프레임 - contains() 포함되는 글자 찾기 (0) | 2021.12.26 |
|---|---|
| 파이썬에서 압축파일 푸는 방법 압축푸는법 (0) | 2021.12.02 |
| 인터넷 파일 다운로드 , 구글코랩 에서 인터넷 파일 다운로드하기 (0) | 2021.12.02 |
| 판다스 seaborn 히트맵, heatmap 히트맵 사용하기, 여러 데이터프레임 수치화 하기 (0) | 2021.11.26 |
| 구글 맵 API -Geocoding API 설정하는 방법 (0) | 2021.11.26 |